Installing or Replacing AMB Intake Manifold and Gasket - Audi A4, 1.8T
Discuss this mod - Here |
||
| Prior Experience: None | ||
| Cost: approx $5 | ||
| Time: 35 Minutes | ||
I recently picked up a powdercoated valve cover and intake manifold. This writeup is to show you how to pull/swap the intake manifold and change the manifold gasket. You probably have to do less steps if you only want to change the gasket, but this should get you to where you need |
||||||
SUPPLIES - For this mod you will need a new intake manifold gasket and the manifold. Basic hex bits and standard hand tools are all that is needed for tools |
||||||
|
||||||
The very first thing you need to do is drain the coolant from the system. To drain the coolant, look for the Coolant Sensor on the driver's side of the vehicle down below the headlight. There is a clip holding it into place. You remove the clip and pull the sensor out. The coolant will start pouring out - so have a bucket ready. This process was covered previously on the Big Turbo Upgrade DIY After the coolant is drained, you need to pull the fuel injectors/fuel rail out of the manifold. This has been covered elsewhere on this site, on the Injector Install DIY . After you pull the injectors, it is a good idea to plug the holes with a cloth or shop towel so you don't drop anything down in the holes. |
||||||
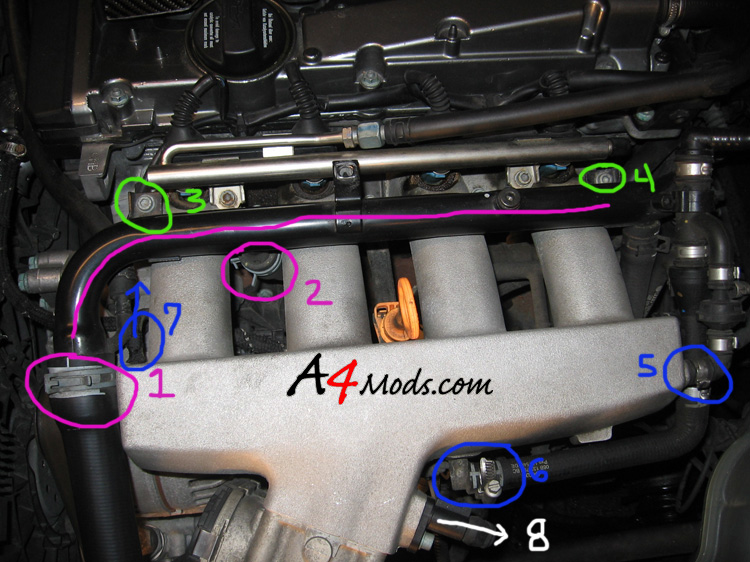
There are various items you need to disconnect from the manifold in order to get it out. Since they are so close to each other, I will work off of this one picture for the next three steps. |
||||||
 |
||||||
1) First you should disconnect the two hose clamps circled in purple. The hard line that runs across the top of the manifold carries coolant. Since you drained the coolant, most of the mess should be prevented. However, I still leaked some coolant after disconnecting the connection labeled "#2", so you will probably want to try to line up the bucket under this spot. I used a pair of pliers on each of these hose clamps. You may have to work a small flathead screwdriver between the rubber hose and the hard line to break them free. 2) With the coolant line disconnected, you can unbolt bolts 3 and 4. This will free up some slack in that hard line. Note: You do not have to actually remove the hard line, just free up enough slack to get the manifold out. 3) Next disconnect the various air lines labeled 5, 6 and 7. These should have one time use clamps on them. You can easily work these free by inserting a small flathead screwdriver under the tabs and tapping the screwdriver with a hammer. Be careful not to be too forceful as the 'nipples' the hoses are on are known to break. 4) Disconnect the IAT sensor connection labeled 8.
|
||||||
Next think you need to do is disconnect the intake hose from the throttle body. There is only one hose clamp to undo. After the intake hose is disconnected, you need to pull the throttle body off of the intake manifold. There are 4 bolts holding it on, two of which are circled |
||||||
When the throttle body is pulled, you will see the support bracket under the manifold. Unscrew this bolt next. |
||||||
With these connections undone, you can then unbolt the manifold from the engine. There are 8 bolts and 2 nuts which need to be removed. I don't have a good picture, but one look at the manifold and you will clearly see them They are approximately outlined in red. |
||||||
When you disconnect these 10 manifold bolts/nuts, you will see that two of them actually connect to a bracket which then connects to the dipstick tube. Be careful with these. If you are not careful, you will break the dipstick tube. After you get the two bolts for the dipstick tube bracket off, you can pull the bracket off of the dipstick tube (there is a small plastic connection that you need to push on to release the bracket from the tube) |
||||||
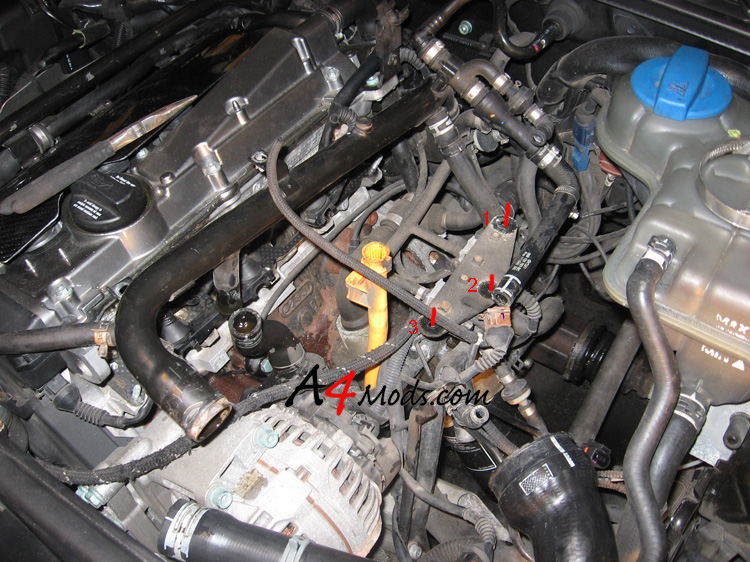
You can now pull the manifold up and off the two studs which it is resting on. You will notice that there are still air hoses connected to the UNDERSIDE of the manifold. I did not forget about these. You can pull the manifold off the engine studs to give yourself more wiggle room to access the air hoses underneath the manifold. Unfortunately I do not have a picture of the underside of the manifold, however in the to the right I have drawn where the three bolts were coming up from. The three red lines would be the bolts which bolted into the manifold. You will have to disconnect these to get the manifold out of the vehicle. |
||||||
| Here you can see the old gasket. You just need to pop this one off and pop the new one on. | ||||||
The install is exactly the reverse. I will note, that installing the manifold bolts can be a hassle. If you do not have a magnetized bit, expect to drop a couple bolts. I used an extended magnet to setup prevent this. You can see what I did here to the right. |
||||||
| Really that is all there is to it. After you get it all bolted up, you can re-fill the coolant and sit back and enjoy your work. | ||||||
 |
||||||
