Audi A4 Lumbar Support Replacement
Prior Experience: None
Cost: approx. $130
Time: aprrox. 30 minutes
| Discuss this mod - Here | ||||||
|
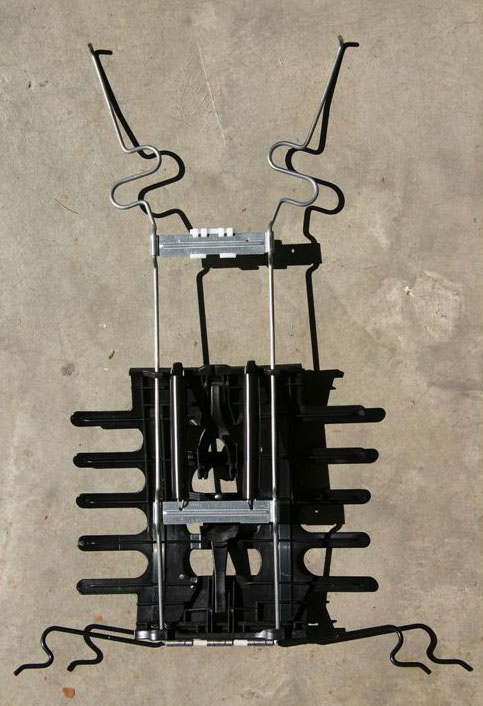
A common and annoying failure on the B6 A4 is the lumbar support in the driver's seat. The supporting bar at the bottom of the support is poorly made and will fail if you lean back to far on the lumbar support. The most annoying part is that you have to replace the entire lumbar support to fix this. I wrote this up since the failure is so common SUPPLIES - The only things you need for this install is a flathead screwdriver and the new lumbar support
|
||||||
|
 |
|||||
|
||||||
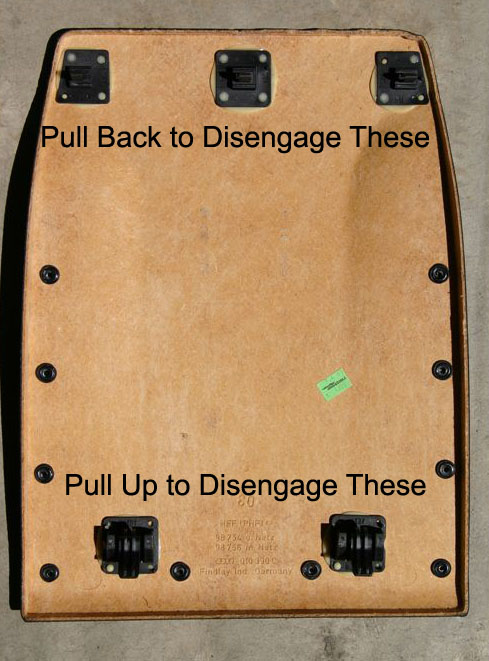
The first thing you need to do is remove the seat back cover. Unfortunately for most of us the seat back cover also breaks when the lumbar support breaks. It is usually just hanging there by the time you get around to replacing the lumbar support. To remove the cover you must take your flathead screwdriver along the TOP edge and pop out the three retaining clips. Then you can pull it back from the top edge and lift it UP towards the roof of the car to disengage the bottom retaining clips. Here is a pic of the removed seat cover. |
 |
|||||
With the seat cover removed you can see the broken lumbar piece I tried to repair mine first but failed. So I replaced it. In the pic to the left you can see my poor repair work |
||||||
To remove the lumbar support you need to disengage two clips at the top and two connections at the bottom. Since mine was already broken at the bottom, I decided to just cut the lower support bar with a dremel to make it easier to disengage the bottom. With the bottom disconnected you can reach up and disconnect the top. There is not real easy way to explain it, but I will give it a shot. The upper two bars hook back into the metal support at the back of the seat. You can follow the bars to this point and then push them towards the front of the car. I pushed them hard enough and they popped out. If you break the clip, don't worry. I broke one and it didn't harm anything. |
||||||
Since it is a motorized lumbar support you need to disconnect the motor cables. First adjust the lumbar with the control so that the motor cables have the least tension. Next you have to disconnect the gold clip of the one motor. The easiest way to do this is to first disengage the springs at the top of the support |
||||||
With the springs disconnected you should be able to push the support towards the top to disconnect the gold clip. |
||||||
Next pull the top of the support down towards the bottom to relieve tension on the center cable. Disconnect the center cable Use a pair of needle nose pliers if necessary. |
||||||
| After the motors are disconnected swap in your new support. This may seem relatively straight forward, but it can be a pain for sure. The bottom connections (which I cut) are very difficult to get right - hence why I cut them in the first place. | ||||||
If you take a look at the picture to the left, you will see what I mean. |
||||||
In order to get the first side in you have to really turn the top 'curve' into the seat foam as far as possible. If there was no cushioning then this would be very easy however since there is, you will have to take your time. Clearly the part was made to be installed from the front of the seat, not the rear. |
||||||
To get the other side I actually had to start it and then tap it in with a flathead screw driver and a hammer You can see what I mean in the pic to the right. I highlighted the dark spot so you can see |
||||||
When you get both sides back in you are all set. Just pop the cover back on (put the bottom on first then pop the clips in) |
||||||
| Good Luck | ||||||