Audi A4 Stock Headunit - Sub Install
Prior Experience: Not necessary
Cost: approx. $80
Time: aprrox. 1/2 days
| Discuss this mod - Here | ||||||||||||||||||||||||||||||||
I have received several questions regarding installing a sub/amp off of a stock head unit. It is not as difficult as people think so I figured I'd make a quick, and I mean quick, writeup. It may be a little wordy, but I think it all makes sense. The pictures were taken after the install so they may not be that helpful - we shall see.... This pertains to the BOSE Symphony II and perhaps other stereos at the users discretion. It is recommended that you disconnect the battery before working on electrical stuff. Since I do not have my head units security code I did not. Please be careful....you don't want to short anything out! |
 |
|||||||||||||||||||||||||||||||
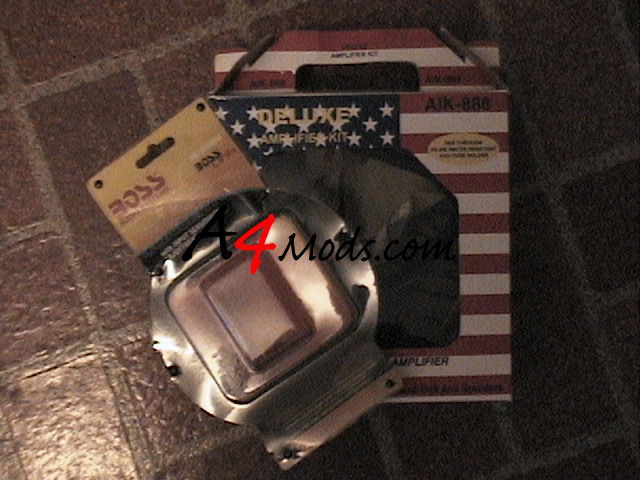
SUPPLIES - after you buy your amp and sub you will need to get some wiring supplies. The easiest way to do this is to buy an amp kit for whatever watt amp you are running. I picked one up at a local, relatively ghetto, stereo store for like 50 bucks. On top of the kit you will need some other things. Here's the complete list, including what's in a 200 watt 'kit' |
||||||||||||||||||||||||||||||||
|
 |
|||||||||||||||||||||||||||||||
Picture is of empty boxes since it was already installed |
||||||||||||||||||||||||||||||||
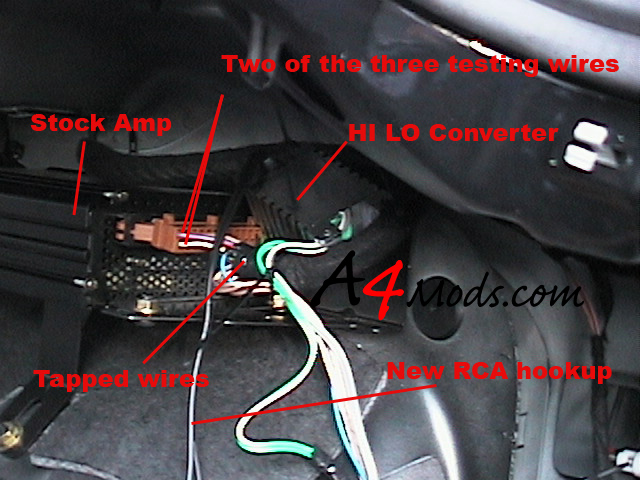
| On a standard installation you would have to run RCA cables and the remote wire from the rear of the aftermarket head unit to the trunk where the sub/amp would be installed. Since we do not have RCA outputs on the back of our deck, we need to get the from somewhere else - this is where the HI-LOW converter comes in. The one I purchased from BOSS audio (#B65N) requires the input of 2 speakers (traditionally the two rear), With the rear speakers installed in the door, it would be a real pain to take off the door panels to tap into the wires. Because of this I decided to tap them right at the system stock BOSE amp. -- The only problem now is that there are so many wires, who knows what goes to what?? Thanks to my Bentley, we are good to go. So lets get started. | The very first thing you need to do is to remove the right side trim in the trunk in order to access the amp. To do this, refer to the sub-box or amp rack install guides. After this is removed it's time to start taping into the wires. For your reference, heres what you will need to know: |
|
||||||||||||||||||||||||||||||
When I splice wires, I try not to ever cut the original wire. Instead, I take a razor or in this case, a swiss army knife and cut off a half inch section of the insulation to expose the bare wire. I then wrap the taping wire around the bare section and electrical tape the whole thing up. I feel like the connection is better and has less of a chance of coming apart. Here's what I mean: |
||||||||||||||||||||||||||||||||
 |
||||||||||||||||||||||||||||||||
The next step is to tap into the amp for the remote turn on led. For those of you who do not know, this is the wire that turns your amp on when your car turns on. I forgot to write down what wire this was on the back of the amp, but this is good. EDIT: It's pin number 25 (shown below) This way you get to do some investigating on your own. The way you do this is this: On the right side of the amp, you will see 3 larger wires. One is the power, one is the ground and one should be the remote turn on. To test for what is what you need to use your 5 dollar voltage tester. All this thing does is glow when there is a voltage, and that's all you need it to do! |
Take the black end of the tester and connect it to a ground. A bolt into the frame of the car usually works really well. Then, with YOUR CAR OFF, you take the other end of the tester and touch each of these 3 wires, one at a time. One wire should make the LED glow, the other two should not. Our remote turn on is one of the two that did not. From here, you turn on the car, or at least turn the key enough to turn on the radio and repeat this procedure. This time one of the two that did not light up last time will light up - this is your remote turn on. Once again, it is ON when your car is ON and OFF when your car is OFF. got it?? |
|||||||||||||||||||||||||||||||
After you have located the remote turn on, splice the blue remote turn on wire to it just like you did the speaker wires. At this point you should have 1 blue wire to the stock amp remote turn on and should have your HI-LO converter tapped into the speaker outputs - in total a max of 5 total connections to the stock amp, or a minimum of 3 depending on your converter. |
||||||||||||||||||||||||||||||||
 |
||||||||||||||||||||||||||||||||
Heres what mine looked like |
||||||||||||||||||||||||||||||||
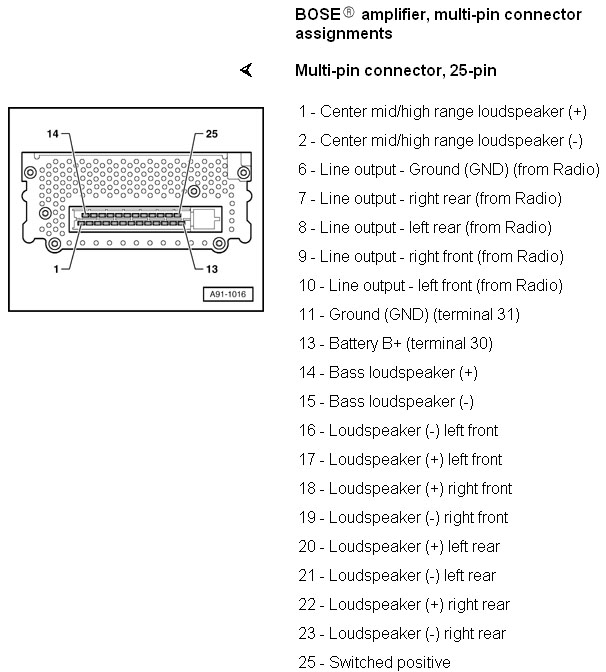
After your remote turn on and your HI LO converter are wired into your amp it is time to wire the power and ground wires for your amp. The ground wire is the easy one. It can get connected to any bolt that goes into the frame of your car. If you take the time to sand down any paint so that it is a metal-metal contact you will get a better ground. I highly recommend this. You should connect it to a bolt as close to the amps location as possible - remember, long wires = high resistance so keep them as short and neat as possible. UPDATE: Since I wrote this up, I have found some useful information in my Bentley Manual (www.bentleypublishers.com). As one would expect, the amp which is currently installed requires Lo level inputs (just as the new amp will require). Instead of using the Hi-Lo converter to convert the hi level speaker signals AFTER the amp to low signals, we can just use the same low level inputs the stock amp is using. With the Hi-Lo converter the setup is actually doing this: Head unit sends a low level signals to stock amp, stock amp amplifies it to a hi level ouput. The Hi-Lo adapter changes high level output back into a low level input for second amp, second amp then reamplifies the signal. Clearly this is a round-about way of doing things but at the time I didn't have the resources to do it any other way. NOW I wish I had done this another way. Like mentioned above you can tap into the low (line) level inputs of the stock amp for low level inputs of your second amp. Although I will not cover exactly how to do it here, I will give the pinout of the BOSE amp incase you are interested. |
||||||||||||||||||||||||||||||||
|
||||||||||||||||||||||||||||||||
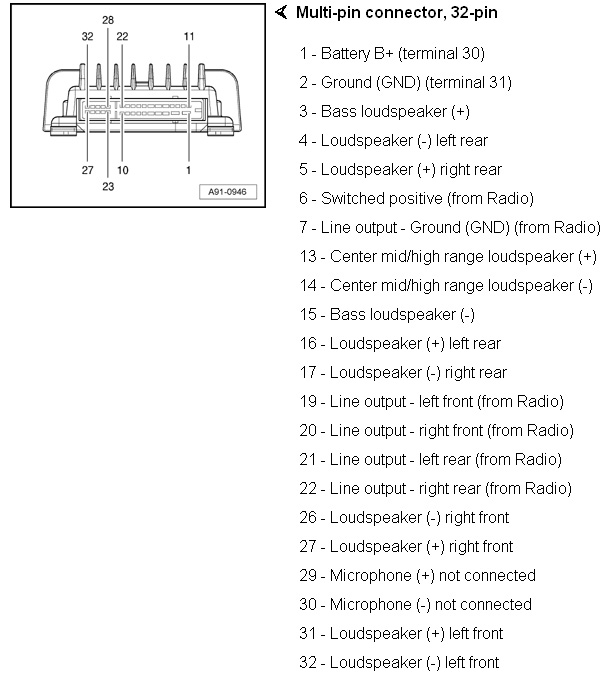
For those of you with a non-bose stereo, this should be your amp connection | ||||||||||||||||||||||||||||||||
|
||||||||||||||||||||||||||||||||
|
Ready for the power wire?? The power wire is the biggest pain in the ass usually. In past installs I had to drill the fire wall, etc. to get it to work. After about 45 minutes of searching under the hood of my car, I found a spot where I could run the wire without drilling. |
||||||||||||||||||||||||||||||||
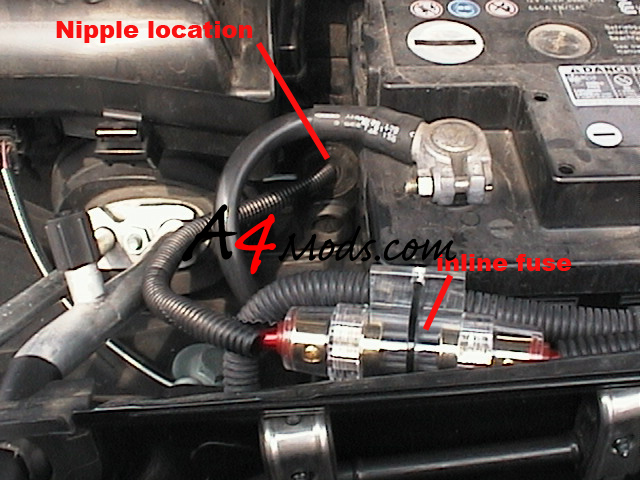
This spot is located on the passenger side of your car just past your battery. To get to it you will have to remove the plastic trim that covers the battery. You just have to remove the rubber weather strip that goes the width of your car and the plastic part will pull right out. You will see a nipple, which I have cut off to run this wire. After you cut off the nipple, you can feel around with your finger. You will feel some rubber insulation that runs up your firewall on the inside. You should put a SMALL hole in this - best if it's as close to the power wire diameter as possible. For those of you who have never installed amps before, you will soon know why a metal coat hanger is an installers best friend..... |
 |
|||||||||||||||||||||||||||||||
Un-bend your coat hanger by first cutting off the "hanging" part. Try to bend it by hand to be as straight as possible. You then want to slide the coat hanger through the nipple and through the hole you have made - almost straight down along the firewall untill it sticks out on the interior of your car beneath the glove box. I can guarantee this will be easier if you remove the glove-box. It is held in by like 6 screws, so it may be worth the effort if you don't get the hanger to go through on the first couple shots. |
||||||||||||||||||||||||||||||||
After you get the hanger to poke out to the interior of the car, you should tape the power wire to one end and use the coat hanger to pull it though the hole. I usually bend one end of the hanger around the wire and use some electrical tape to make sure it doesn't separate while pulling though. Refer to the diagram to the right...kinda funny looking...haha The pic below is where the wire should come out... |
 |
|||||||||||||||||||||||||||||||
 |
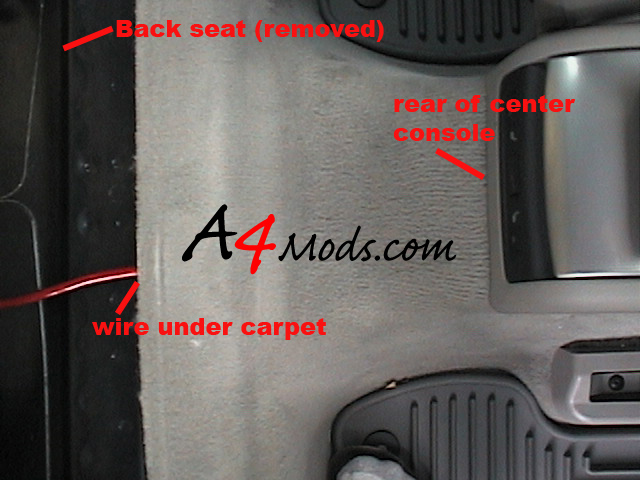
In order to run the power cable along the side of your car, you need to remove the lower side trim along the lengths of your doors. In order to do that you need to remove the upper trim along the A,B,C pillars.....this is all annoying as hell - especially since the only wire we are running is power (remote and RCA are already in the trunk!) I decided to go the easy route and run it along the center of my car. I simply pushed it under the edge of my center console. When I got to the end of the console, by the ashtray and rear heated seats, I lifted the back seat and once again used the coat hanger to help me run the cable under the rug. (To get it under the rug I made a small slice in the rug, under the console - no one would ever see/know it) With that last coat-hanger move, your cable will be under the rear seat - from there it is one shot to the trunk.....that wasn't so hard... |
|||||||||||||||||||||||||||||||
 |
 |
|||||||||||||||||||||||||||||||
 |
||||||||||||||||||||||||||||||||
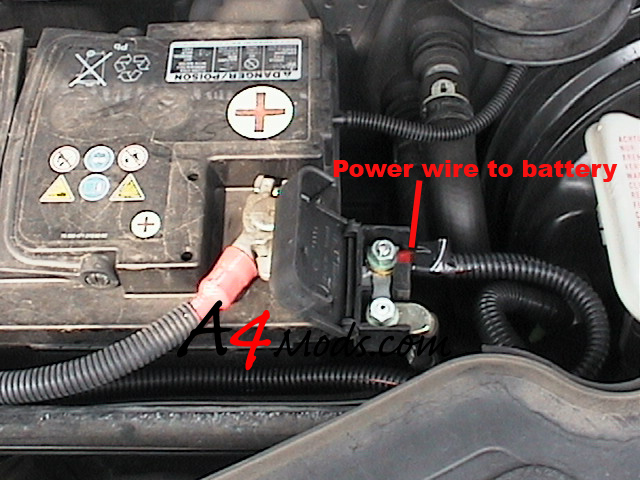
Ok now its time to get back under the hood. You will need to connect the power cable to the positive battery terminal. DO NOT forget to install the in-line fuse or your car will become a major fire hazard. Try to keep everything neat and use the wire loom to cover any wire that may be visible (hopefully only under the hood). I didn't want to drill anything so I zip-tied my in line fuse in place so it would not move around....here's what it looks like: |
||||||||||||||||||||||||||||||||
 |
|
|||||||||||||||||||||||||||||||
After you get the power wire to the trunk and connected to the battery you are good to go. I usually recommend not inserting the fuse until the amp is connected - this way you don't accidentally short anything out if you mis-handle the other end of the power wire. At the end of everything you should have 1 power wire, 1 ground wire, 1 remote wire and 2 RCA connects in your trunk - you can connect these to whatever amp/sub combination you own and your are good to go..... Good luck and don't short out your car! |
||||||||||||||||||||||||||||||||
|
Currently Online Maximum Simultaneous Users |