Southbend OFE SS Clutch Removal and Install - B6 Audi A4
Prior Experience: Very Difficult Job. You should know what you are getting into!
Cost: $585 for clutch, $100 for flywheel resurfacing. $800+ saved on labor
Time: 12 to 14 hours
| Discuss this mod - Here | ||
| NOTE: All pics are hyperlinked to higher resolution versions. | ||
 |
 |
|
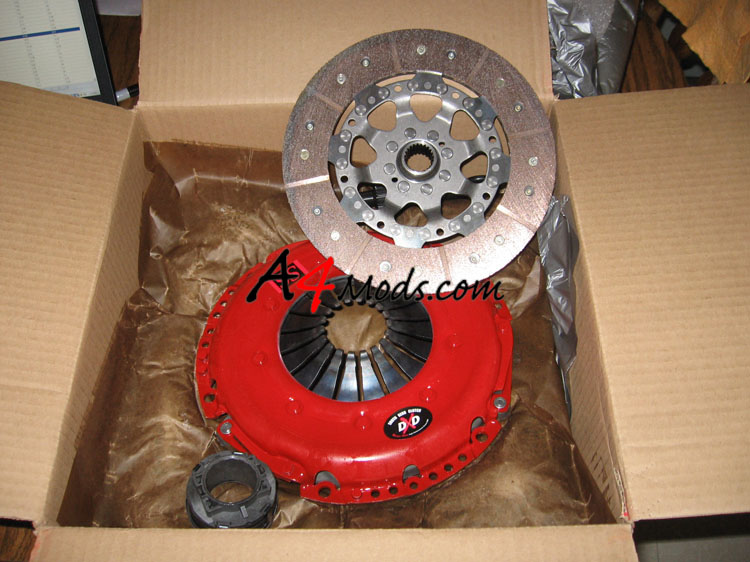
| New | Installed | |
Ok, so you decided to get a new clutch right? You probably called the dealer or whatever shop you go to and found out it was atleast $700+ in labor alone to get it installed. Perhaps you searched around the web and found some writeups and figured you could do it yourself. Well before you proceed, I recommend you read this ENTIRE tutorial. And I also recommend you really know your limits, and know if you are up to this job. It is not simple by any means. I would not recommend doing this unless you have access to lots of tools and a lift. I would be lying to say that the clutch removal couldnt bedone on jeackstands, but I know I would not have been able to complete the job without a proper transmission jack and a lift. Although you can be saving yourself a tremendous amount of money, if you mess up, you can be costing yourself even more. Please use extreme caution when doing this job. |
||
SUPPLIES - As far as tools are concerned, you will need lots of them. In particular, you will need a full metric socket set. Lots of extensions (atleast 3 feet worth), several swivel sockets (2 minimum), a full hex head set, a full torx set, and a set of triple square bits. You will also need loctite (the blue kind), axle grease and new flywheel bolts. DO NOT reuse the flywheel bolts. Buy them at the dealer for $4 each because you will be torquing them to stretch them. You will also need a bentley manual. If you dont have one, you should not consider this job. If you are serious about working on your car, and you want to do things right you NEED the manual. It has all the torque specs for the bolts, and other usefull information. It can be purchased at http://www.bentleypublishers.com/ I also recommend you read Jeff's writeup for his clutch removal and install found at http://www.audigeeks.com/forums/index.php?topic=94.0 I used his guide along with the bentley to complete this install. I will be borrowing pictures from his writeup throughout this guide. One last note....You want to be VERY NEAT with your bolts. They all start looking the same after a while. LABEL all of them so you know exactly where they went! This is VERY important because you may overtorqe a bolt and break it! I took the pictures of the INSTALL, so they will be in the reverse order since this guide will be written as an uninstall. Ready? |
||
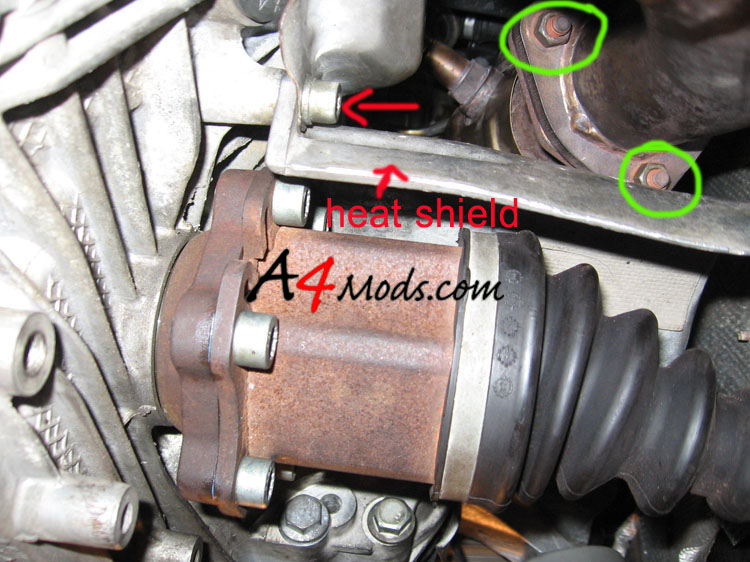
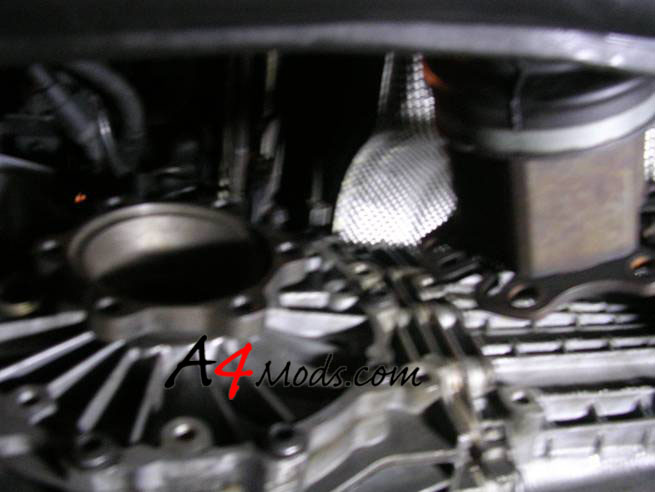
The first step of the clutch removal is to remove the center pipe of your exhuast system. In order to access the three bolts that connect this pipe to your catalytic converter, you will need to remove the CV Boot heat shield. It is held on by three hex bolts. The picture to the right shows 1 of the three bolts holding the heatshield on. There are two more - one on the top, and one on the backside. Circled in green are two of the three bolts you need to remove to get the center exhaust pipe off from the CAT. If you have not removed these before, you can expect them to be a BIG pain. You can read about my sorrows in the Neuspeed Exhaust Install |
 |
|
| After you get the heatshield out, you can unbolt the exhaust from the cat. | 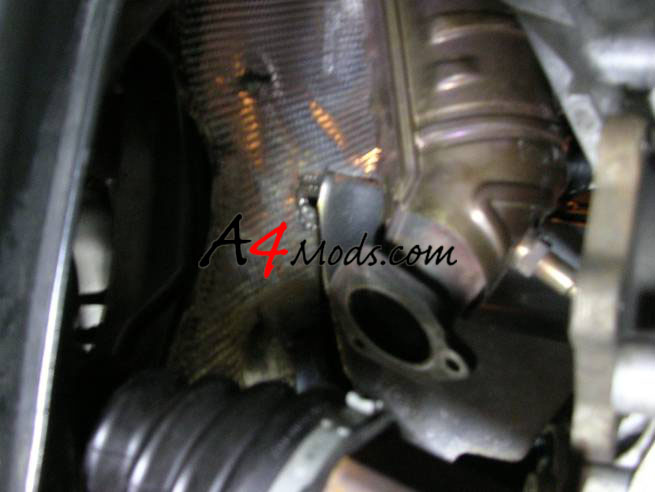 |
|
After the exhaust and heat shield are removed, you want to unbolt the passenger side half shaft from the transmission. There are 8 triple square bolts (10 mm i believe) holding these half shafts on. To break them loose you may need someone to hold the front wheels so that they dont spin. After you get it off, you will want to push the half shaft out of the way (towards the rear of the car) |
||
 |
After the passenger side is done, remove the half shaft from the driver's side as well. |
|
After the two front drive axles are removed, you want to unbolt the main drive shaft. There are 8 bolts holding it on. You will need to apply the emergency brake so that you can brake these loose without spinning the rear wheels. I found that the easiest way to seperate the two parts is to lightly push back on the rear section of the shaft, and then pull it straight down and away from the trans. Once again, you will want to tie it up out of the way...To the right of the tranny worked well. |
 |
|
Next, you need to unbolt the starter from the trans. (located on the passenger side) There is one bracket at the rear of the starter that needs to be removed. DISCONNECT the negative terminal of the battery before you even GO NEAR the starter. Then continue to unbolt the rear support bracket of the starter (shown in red). You MAY want to go ahead and unscrew all the wires, but that is not necessary. |
 |
|
You will see the starter itself is bolted to the trans from the rear (two bolts, 16mm I think). The two bolts holding it to the trans are located approximately where the yellow circles have been drawn. After you have disconnected the bracket on the rear of the starter, you can disconnect the bolts that hold it to the tranny. You will then be able to pull the starter away from the tranny. At this point, you will see a very annoying heatshield that is attached to the starter. I decided to keep it there, but you may want to detach that if its being a pain. Also, take note of how all the cable to the starter are run. There is one which comes over the trans and has its own heat shield which is actually bolted to the trans. Make sure you take note of how it is run so that you can be sure to put it back in the right place! AT THIS POINT: You want to support the transmission. You may be using a trans jack (hopefully) or a floor jack, but whatever it is, you want to support the weight of the tranny before you continue! |
||
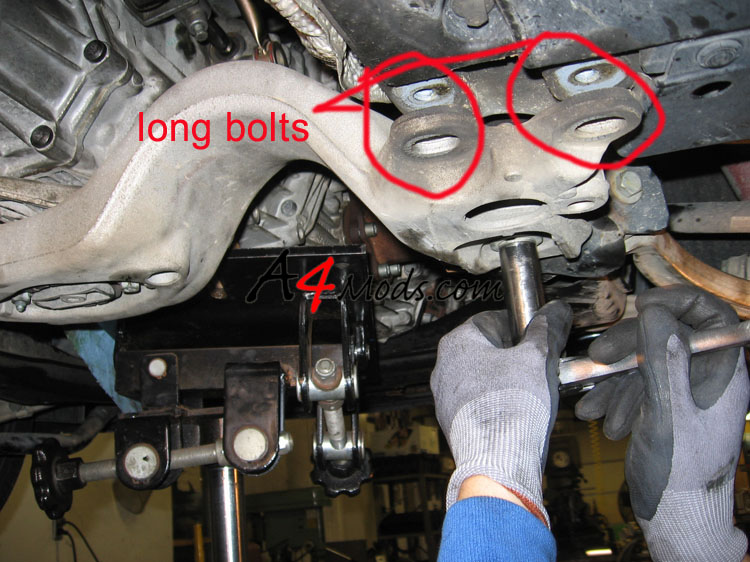 |
The next step it to remove the rear support bracket for the trans. It is bolted into the frame of the vehicle with 3 bolts on each side of the car. With the trans supported by your jack, go ahead and remove these bolts. There are two long ones on each side, and one shorter one. You're labeling all of these right?! |
|
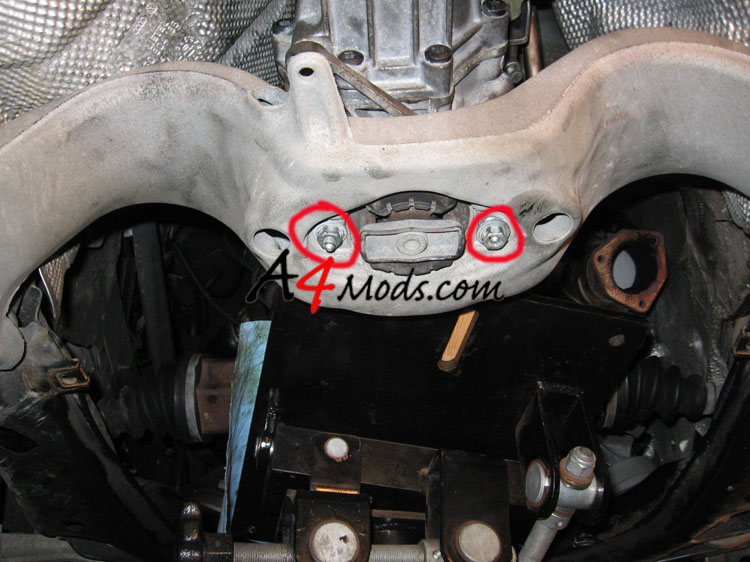 |
When you unbolt the support from the frame, you can remove the two nuts that hold the support to the tranny. |
|
The next step is to unbolt the gearbox from the transmission. There is one bolt, and one torx bolt. You will notice that when you unbolt the torx bolt, it will remain in the linkage because there is a lock washer on the back end of it. After it is unbolted, I suggest you grab the lock washer with a pair of plyers while you continue to unscrew the bolt. I suggest this because when you remove the trans, you may get it caught on the bolt if it just remains in the shifter linkage. (you will see what I mean when you get there) |
 |
|
The next thing you need to do is start unbolting the trans from the engine. There are about 9 or 10 bolts which hold them together. I started by breaking each of them free. It is impossible for me to show you pictures of where the bolts are, but most of them are in plain view. There is one at the VERY top that you will have trouble getting out. A mechanic suggested to get it from the top (go under the hood, remove some heat shields, etc.), but I followed Jeff's suggesting and fabricated a VERY long extension. It consisted of the socket, on squivel and lots of extensions on a 1/2 inch wrench. I actually removed the bolt from behind the trans (PAST where we disconnected the main drive shaft). It was a HUGE extension. It helped to have someone else there as they were able to wrench it, while I held the socket on the bolt. However you choose to get this one, good luck. |
||
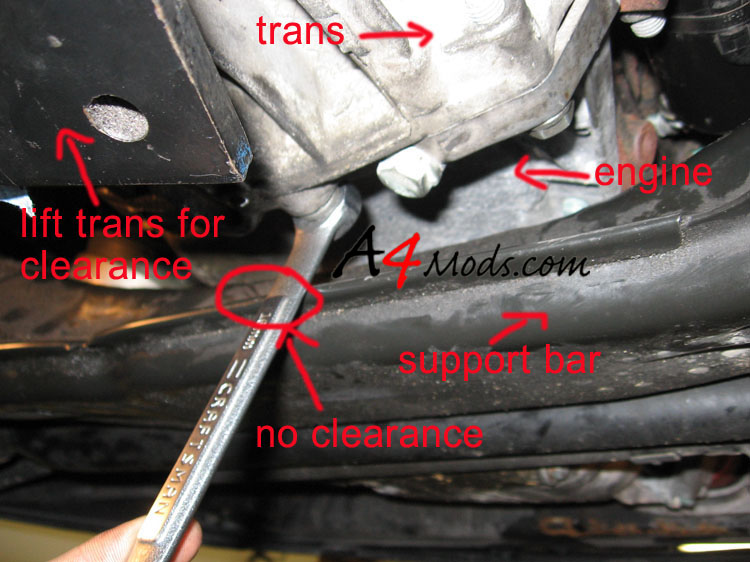
Some bolts that are easy to show you, that can present a problem are the three along the bottom of the trans. There is not much clearance to get a tool on these, so you can simply jack up the trans little bit, and put the 16mm box wrench on them. With only a box wrench, it may be tough to break them loose. But keep trying, they will eventually go |
 |
|
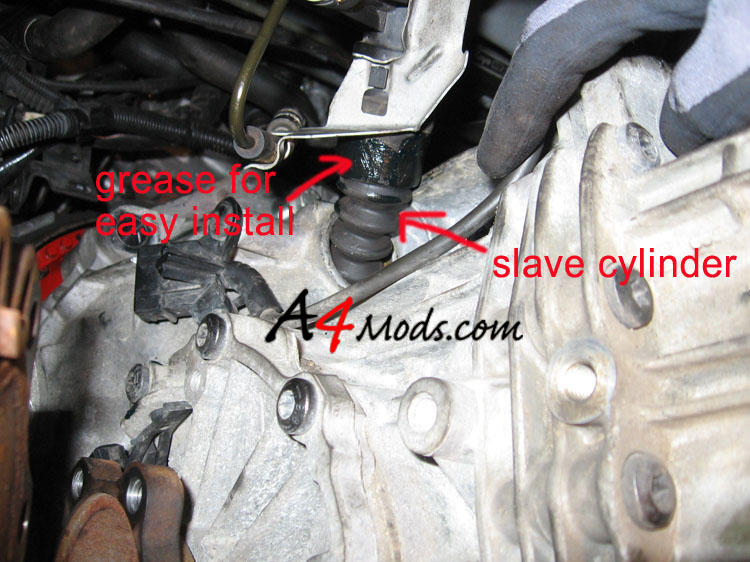
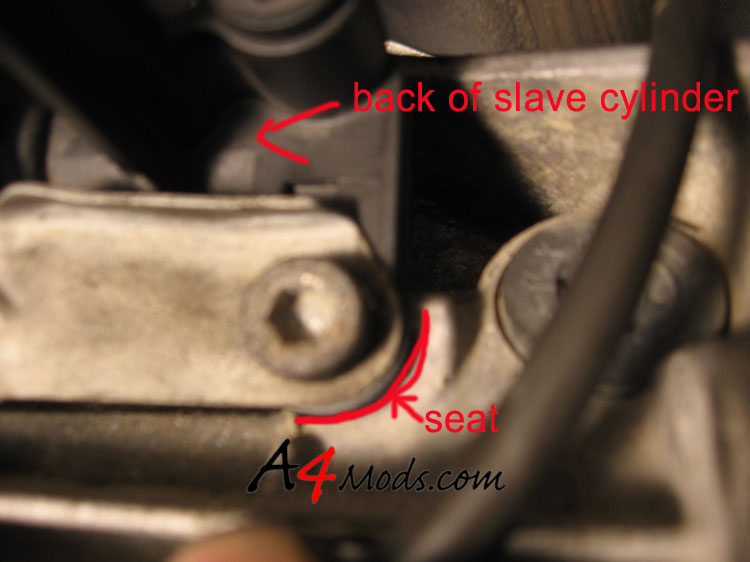
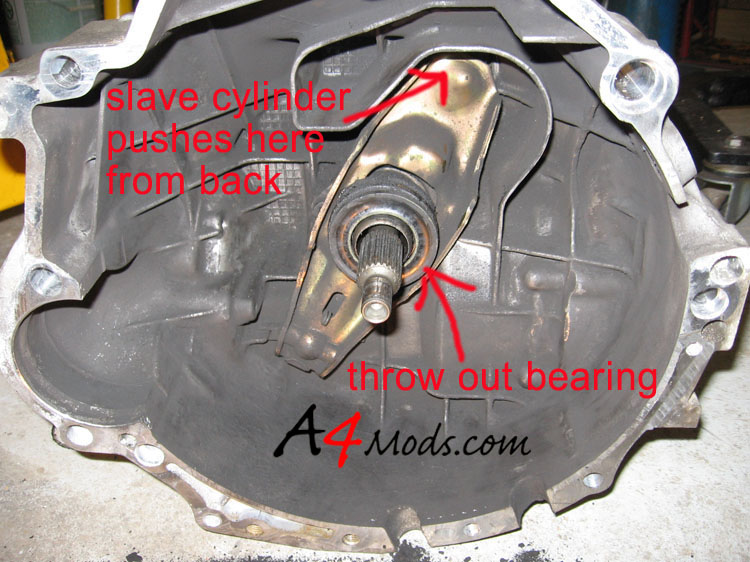
With the trans supported, and the trans-to-engine bolts removed, you can start to pull the trans out. The first move is to pull it slightly back to disengage the driveshaft teeth. After it slides back about 2 inches, you should be able to START to lower it. THIS IS THE MOST SENSITIVE PART OF THE OPERATION SO PLEASE READ!! You will need to slide the trans back, and lower it EVER SO SLIGHTLY because the slave cylinder is STILL CONNECTED TO THE TRANS. The slave cylinder is a very fragile part, and you need to be sure not to bend the hoses or damage the cylinder. When you drop the trans about 3 inches, you will be able to reach up and disconnect the slave cylinder. EDIT: If your hands are small enough, you should be ablet o disconnect the slave cylinder BEFORE lowering the trans. This is not how I did it, but you may be able to get the slave out of the way first. If it is possible, I would recommend doing that step first. The cylinder is seated into the trans at the back end of the cylinder. You need to unbolt a single bolt, and lightly pull the rear of the slave cylinder towards the driver's side of the vehicle to get it out of the 'seat.' After it is unseated, you will be able to pull the slave cylinder straight back to remove it from the trans. BE CAREFUL! |
||
 |
 |
|
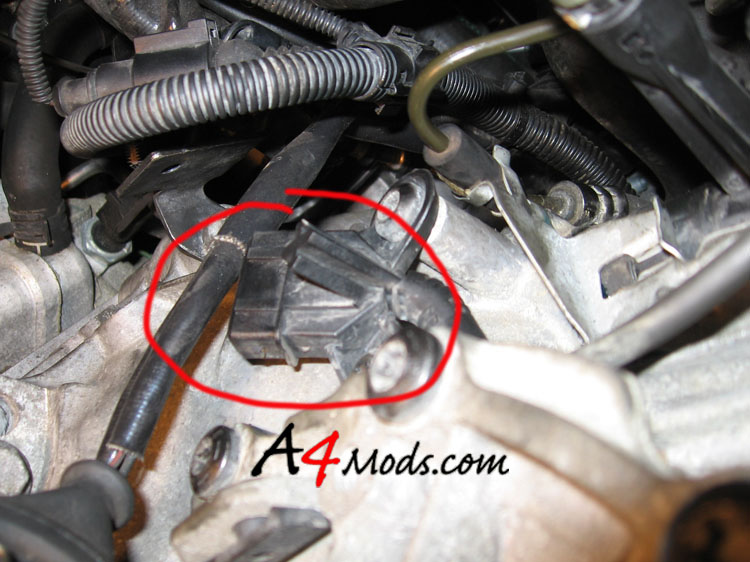 |
As you are lowering the trans, you will also notice two electrical connections which need to be disconnected. Go ahead and disconnect these harnesses (press the metal clips in, and pull the connectors off). | |
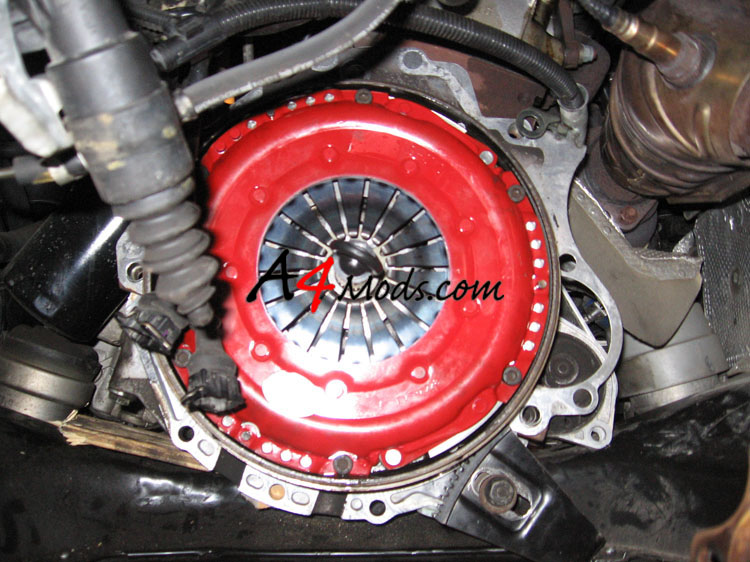
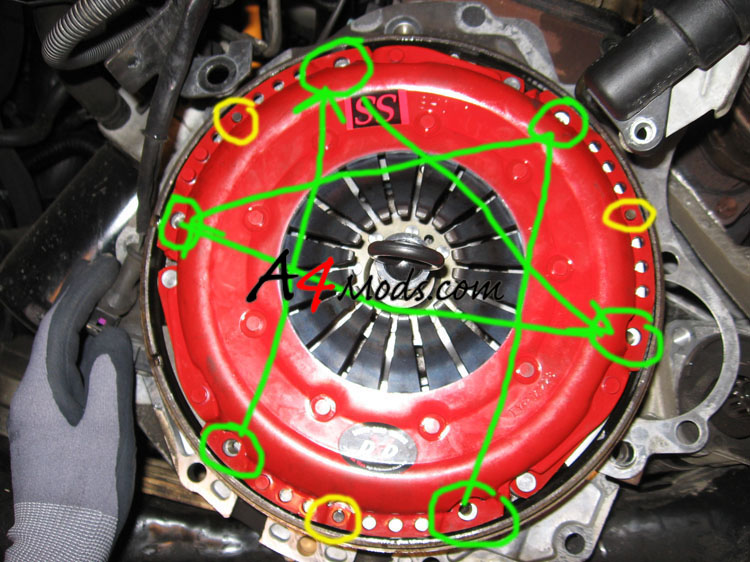
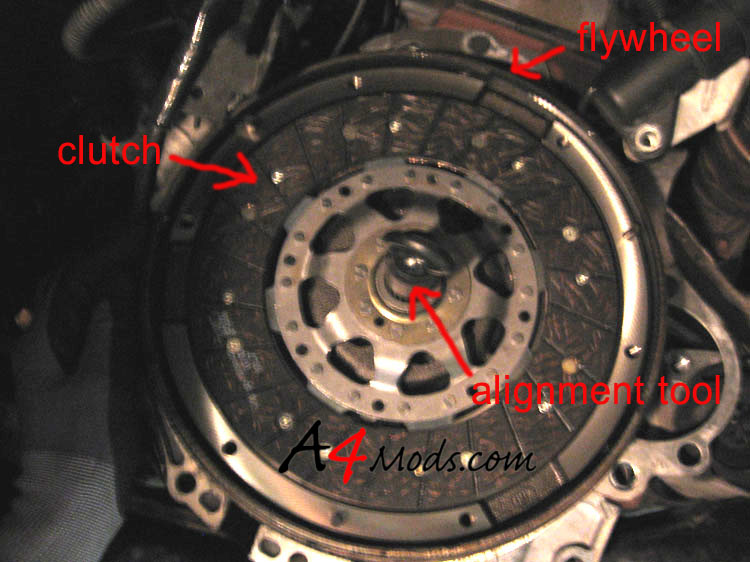
I suggest you move the trans about 2 inches at a time, and then take a good look around to make sure everything is in the clear before you continue moving. Incase you forgot to disconnect something, or incase I forgot to write something in this writeup!! When you get the trans out, you will be able to see the pressure plate. As mentioned previously, I took these pictures of the INSTALL, so the pressure plate you see is clearly NOT the OEM one. Regardless, the uninstall is the same. You will see the pressrue plate has six bolts. Unscrew these in a STAR pattern. |
||
|
 |
|
When you get the pressure plate off, you will see the clutch (or it may come off with the pressure plate) |
 |
|
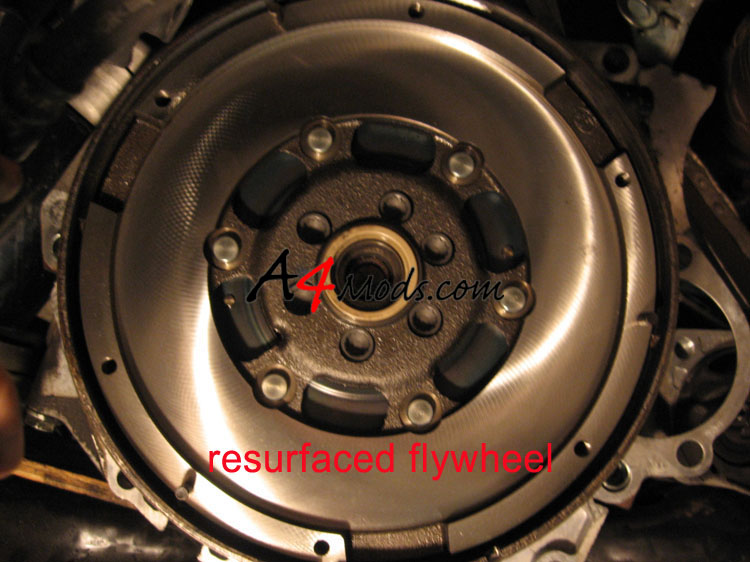
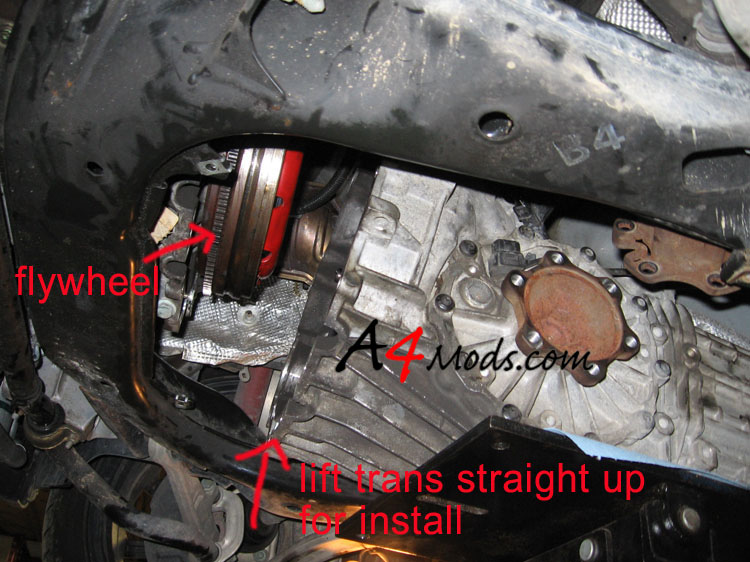
Behind the clutch is the flywheel. The flywheel is bolted on with 6 12mm triple square bolts. You will probably need to lock the flywheel inorder to remove these bolts (so the flywheel doesnt spin). Here you see the (newly resurfaced) flywheel and the 6 bolts |
 |
|
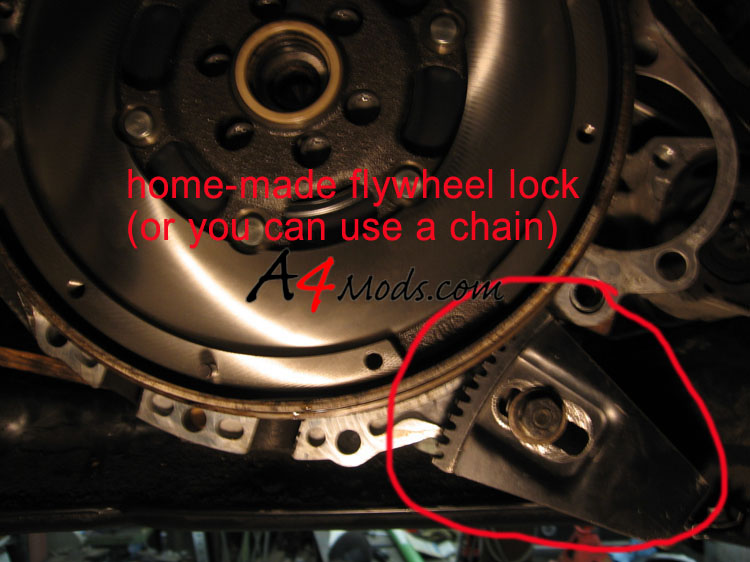 |
This pic shows the home-made flywheel lock I used. If you do not have access to something like this, you can chain your flywheel as Jeff did in the AG writeup. | |
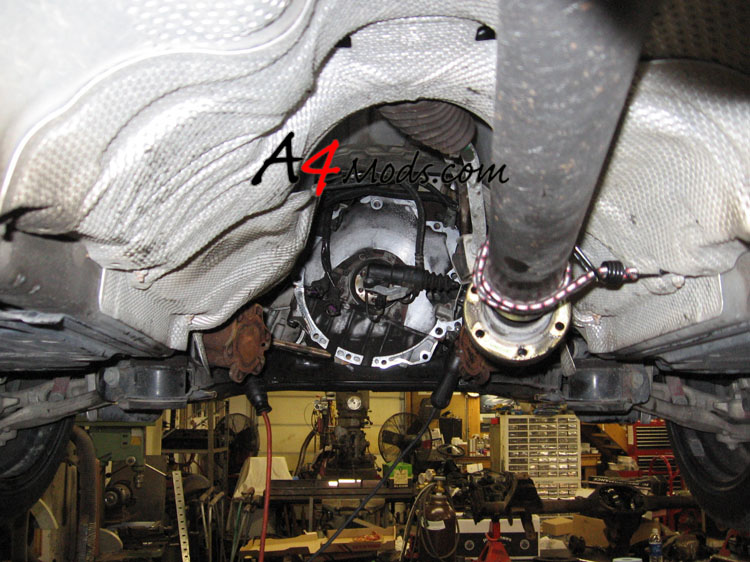 |
After the flywheel is unbolted, pull it off the engine by pulling from the teeth on the outside of the flywheel. After it is out, you will have a view something like this. | |
Install Tips
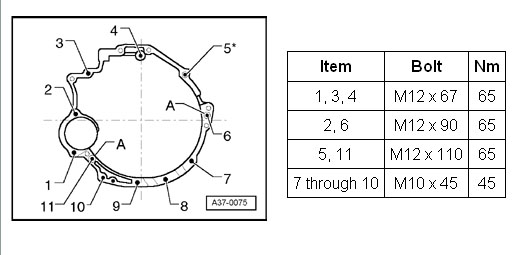
I will not really go over the install. The install is everything here but in reverse. I will go over some key points in this section. 1) Get the Bentley manual, and follow the torque specs (see below for some of the torqu specs) |
||
| 3) On the install of the clutch, you will be using a PLASTIC guide tool. The plastic part has VERY poor tolerances compared to the actual drive shaft. When you use the tool to align the clutch with the pressure plate, it must slide in and out PERFECTLY, without getting caught or hitting anything. It took me and my buddy about 20 minutes to get it just right. As you align the clutch, SLOWLY tighten the pressure plate in the STAR pattern. You should do approximately 1 turn at a time, and constantly check the alignment of with the alignment tool | |
|
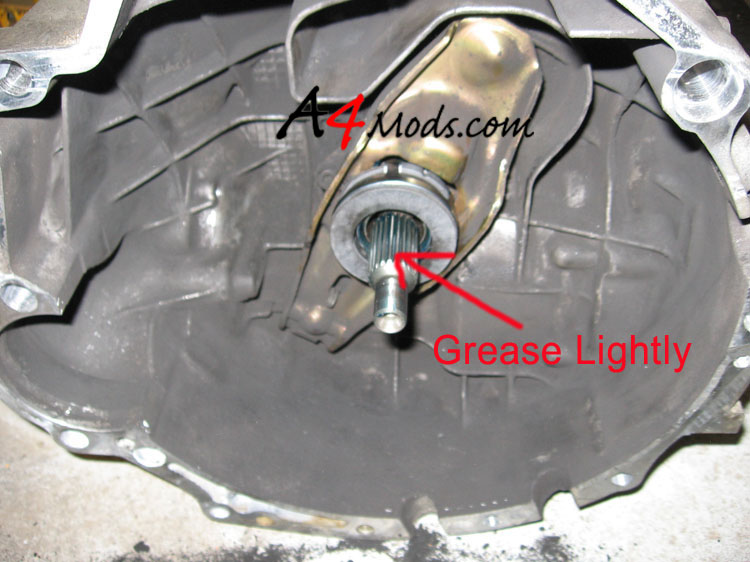
4) There are two plastic clips that hold the throw out bearing in the trans. Press them from the back to release the old throwout bearing, and install your new one. LIGHTLY grease the drive shaft and area where the throwout bearing sits. If you put too much grease, dirt/clutch dust will accumulate and make the clutch 'sticky' |
 |
|
 |
|
|
5) When installing the trans, line it up as close to the pressure plate as possible, and jack it straight up. This will allow you to keep an eye on the slave cylinder and to watch out for that starter cable on the passenger side. You DID note the orientation of that starter cable right? BEWARE of the starter cable. The second time I did the clutch, I pinched the starter cable between the trans and engine. This caused a short and killed my battery. I had to pull the trans to fix this. DO NOT MAKE THIS MISTAKE |
 |
|
6) When you install the slave cylinder, apply some grease to the base of it. This will allow you to push it into place more easily |
|
|
I believe that is all the info I have for this install. Like I said, pick up the bentley, and continue to read BEFORE you start your work. You can save A LOT of money doing this yourself, but you need a lot of TIME AND PATIENCE!. And if you mess it up, you and end up costing yourself more than you would have spend on a professional installation. If you install everything, break in the clutch and are not happy with the engagement point, you can make an adjustment by modifiying the push rod length at the slave cylinder. I show how to do this on the Clutch Adjustment writeup |
||
Torque Specs
|
||
 |