Installing or Replacing AMB Valve Cover and Gasket - Audi A4, 1.8T
This mod is brought to you by Deutsch Teile Haus Discuss this mod - Here |
||
| Prior Experience: None |

|
|
| Cost: approx $25 | ||
| Time: 35 Minutes | ||
It is very common for the valve cover gasket to go bad after 60k miles. The job is very easy to do - but would typically cost about $200 at the dealer. Most people notice their gasket is bad by seeing oil dripping out from under the valve cover onto the exhaust manifold. This typically looks pretty nasty and can cause some light smoking under the hood. I knew mine was bad for about 8k miles before I swapped it. I finally got around to doing it this weekend. The job is only a 30 minute job - I don't know why I waited so long |
||||||||
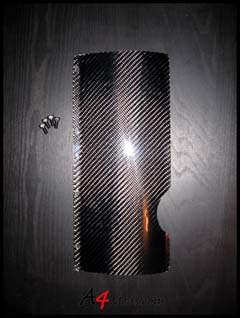
SUPPLIES - For this mod you will need a new valve cover gasket set and some RTV sealant. I decided to swap out my valve cover for a powdercoated one, and to pickup this carbon fiber ignition coil cover from Deutsch Teile Haus |
||||||||
 |
DTH Carbon fiber Coil cover: This is a very nice piece and I was lucky enough to get my hands on a pre-production piece for this writeup. The CF weave is flawless. The part is easy to install and only requires slight modification of the valve cover. |
|||||||
|
||||||||
| The first thing you need to do is pop off the engine cover and the air duct which runs to the airbox. This is very easy and has been done a thousand times on this site. You can check out the K&N air filter install | ||||||||
With the engine cover off, you will now have to disconnect the two PCV lines. I disconnected them at the spots circled here. Note, you may have to wrestle with them or work a screw driver around the hoses as they tend to get stuck to the hard pipe which they are clamped to. |
||||||||
Unscrew the two hex head bolts which are holding the hard line in place. |
||||||||
Next step is to pop the crank case breather hose off. Typically people complain about these one time use clamps. In reality, they are very easy to remove. Take a medium screwdriver and put the tip under the edge of the clamp. Then take a hammer and lightly tap the screw driver. The clamp will pop right off. I used to struggle with them and try to cut them off, then my buddy showed me this technique and I couldn't believe how easy it actually was. |
||||||||
| To get the crankcase breather hose off, you should unscrew the hex bolt to the left the the hose, this will give you enough slack to work it free. | ||||||||
| Here's the crankcase breather removed. | ||||||||
| Next you need to unplug the coil packs. If you have ever followed the Spark Plug Install, then you have already done this. Sometimes people have trouble with these clips. I have previously broken two of the clips trying to get them off. Since then, I figured out a different technique. I used a small right angle pick and just slide it into the harness. It will pop right off. You will also have to disconnect the ground for the harness which is screwed into the cover between the first and second ignition coil. | ||||||||
When you have the harness for the ignition coils unplugged, you can move the timing belt cover forward. To do this, you simply unsnap the two metal tabs where the red arrows are drawn, and pull it back in the direction of the green arrow. You don't need to pull the cover off, just enough to get at the edge of the valve cover. |
||||||||
Go ahead and remove the wiring harness from the valve cover. Do this by cutting the zip ties holding the harness down. Do not try to pop the zip ties out of the valve cover - you will break them that way. Just cut the zip ties - you can re-zip tie them later. |
||||||||
| The next step is to unscrew the valve cover. There are six nuts along the outside edge, and three down the center of the cover. Unscrew all of these, and you will be able to remove the cover. They are circled in RED here. | ||||||||
 |
||||||||
| Once those nuts are removed, you can remove the cover. You will probably have to pry a little bit with a flathead screw driver to break the seal. Just start at the corners on the driver's side and it should come off pretty easily. | ||||||||
Here's what's underneath. Be careful not to let anything fall down there (dirt, etc). It is probably best off that you do this in a garage or another low dust environment. If you don't have the option, then just work quickly and cleanly to minimize any risk. |
||||||||
Here's the underside of my old valve cover. If you are re-installing this, I would recommend cleaning it with some engine degreaser, etc. |
||||||||
| Now you need to remove the gaskets. I started at the passenger side front corner and worked my way around. Mine broke because it was old and brittle. | ||||||||
With the gaskets removed: |
||||||||
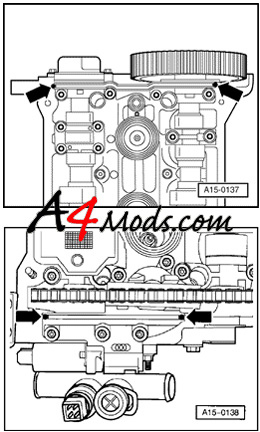
I wiped down the edges, etc before I installed the new gaskets. Before you put the new gaskets on, you need to put some RTV or sealant in some spots. As per the bentley manual, put a small amount of sealant in the spots shown by the arrows in the pic to the right Note that the pic is opposite the orientation of the photographs: (Your bumper would be at the top of the top pic, and your firewall at the bottom of the bottom pic) |
||||||||
Here is what the new gaskets look like installed. When you put the valve cover on, you should line it all up and hand tighten all the nuts. Then when you go to tighten them down, torque them to 11Nm. Start with the center nuts. Then tighten the outer nuts in a crisscross pattern. |
||||||||
Here's a pic with the new valve cover on: |
||||||||
Part 2: Installing the DTH Carbon Fiber Coil Cover
|
|
||
Now on to the new DTH Carbon fiber Coil Cover. In order to install the cover, you need to trim one of the bosses which the stock cover mounted to. To the right I drew a line approximately where it needs to be trimmed. You are basically looking to get it flush with the rest of the bosses.
I just used dremel tool with a high strength cutting wheel to cut through it. I made it about 3/4 of the way, then just popped it off with a screwdriver |
||
Here it is after I popped it off |
||
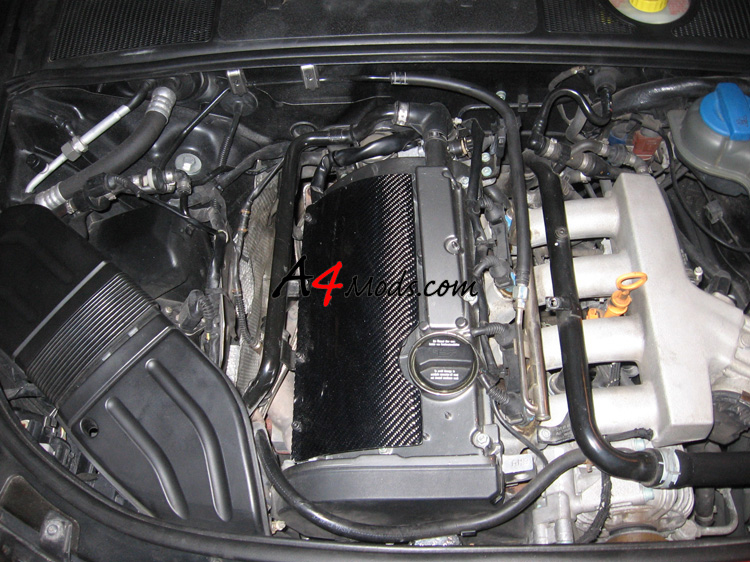
And again after I ground down the rough spots. After you get to this point, it is straight forward. The CF cover has 4 bolt holes which line up with the holes already on the valve cover. Just use the supplied bolts, and install the cover. |
||
| Here's the new DTH cover on: | ||
 |
||
 |
||
You install everything in reverse order. Good luck. |
||

